This post is pretty technical so if you get bored easily just know that we should not have any problems with running out of fresh water :)
While in Vero Beach and actually before we installed any solar panels, I installed and tested our watermaker. And now, after several months of use, I am finally writing about it. This is actually a pretty difficult post to write because there are many details, but I have tried to hit just the main points and give information that might be helpful to someone else thinking of undertaking a home-built watermaker system.
The technical name for a watermaker is a reverse osmosis system, RO system for short, or even a desalinization unit, but most cruisers just call it a watermaker and I have come to terms with that as well. If you don’t know what all that means, it is a system that takes in seawater and removes all of the salt and other possible contaminants so that is safe to drink. The resulting product water is cleaner than most municipal systems!
Of course I could not just go buy an already packaged system, as someone who has over 15 years experience with plumbing systems, I had to build my own for the fun learning experience and to keep the cost down. And before anyone asks about cost, it cost too much. I am considering starting a watermaker consulting business in the islands to help pay for it ;) But seriously, I did spend way less than I would have if I had bought a pre-manufactured unit. There is a serious markup on those types of units considering they are just packaged systems containing similar parts as the ones I ultimately used. Once I figured out if we had the space for it and whether or not it was actually feasible, and also asked Drena for her blessing, I did a cost analysis and determined that it would never ever pay for itself unless we cruised for a very long time. But for me, having the ability to make freshwater regardless of where we were and not having to worry about being overly conservative when salty things need a good rinse, is well worth the price of the system. I also made sure that when I installed it, it would come out pretty easy (and no new through-hulls) so I could move it to another boat or sell it when I am done with it.
The way reverse osmosis systems work is by forcing the seawater through a semi-permeable membrane at high pressure. It is sort of like a big filter, but not really since nothing gets trapped. Instead, the high pressure is used to separate the H2O molecules from the other molecules. The reject, dirty, salty water molecules get sent overboard and the good, clean, product water is sent to our freshwater tanks. Systems usually consist of a high pressure pump, a reverse osmosis membrane and housing, pre-filters to trap the bigger particles, and a boost pump to get the seawater from outside the boat through the pre-filters and to the high pressure pump. There are other incidental parts and pieces such as valves and hoses, but that is too much detail for me to get into here. Below is a schematic of a watermaker system from some cruisers currently in the South Pacific aboard Soggy Paws. Ours is similar but with fewer bells and whistles.

SV Soggy Paws Watermaker Schematic Diagram
There are many things to consider when planning a watermaker installation, but the main starting point is the power source. There are DC-powered, AC-powered, and engine-driven watermakers. The DC-powered water makers are generally really low output and use a whole heck of a lot of power from the battery bank. That means you either need to have some serious renewable energy on-board or you will need to run the engine or a generator to keep the batteries charged up during or shortly after running the system. Since I could not imagine having to run the system for more than a couple of hours at a time and definitely not every day, I decided that a DC powered system did not have enough output for us and was not worth the cost.
I really wanted to get an engine-driven system because of their high output, but there was just no way to put a pump in our small engine compartment without doing some pretty serious modifications and since I wanted to keep it less permanent, I didn’t want to go that route either. So I was left with an AC-powered system.
Having an AC-powered system meant that we had to get a generator, but since there are multiple uses for a generator on a boat, like charging the batteries and running power tools, that was not such a bad thing. The biggest concern was space, so we had to find a small one. There was not much research to do on the generator, I quickly learned that almost all of the cruising boats that have portable generators on-board have a Honda EU2000i because they are small, fairly light, and pretty quiet. They also are fuel-efficient, only using about a pint of gas per hour at full load. I looked for used Honda generators, but people want to charge almost what they cost new, so we waited until we found a deal on one which happened to be at the Annapolis Sailboat Show in October.
Besides the generator, which I argue doesn’t really count since it has other uses on the boat, the main parts of the system that make it somewhat cost prohibitive are the high pressure pump, the membrane and its housing, and the high pressure fittings between the two. The high pressure pumps really aren’t too special, just triplex plunger pumps similar to ones used on common pressure washers except that the materials are different. Most pre-manufactured watermakers use stainless steel pumps, but I had read that many people with home-built systems have had brass pumps last a long time even with seawater. Since they cost about a third of the price of a stainless one, brass sounded like a good option to me. However, after talking to several manufacturers and finding that they just do not make brass pumps small enough to be used with a 2000 watt generator and realizing that all of the people who were using brass pumps had engine-driven systems, I resigned to pay the extra money for a stainless steel one. Per the datasheet, it will pump 1.5 gallons per minute at 1,000 psi requiring 1 hp of input from an electric motor.
The AC motor is where things get tricky. You cannot just go and buy any cheap 1 hp motor and expect the system to work for every long, if at all, because of efficiency losses and membrane degradation. The limiting factor is the generator. When it is running at its operating conditions, the AC motor must not pull more power than the rated load for the generator or you will shorten the life of your generator. But the bigger problem is the starting current. A 1 hp motor may need two times the starting current than it needs to operate once it is running and the generator may not be able to supply that current without tripping its internal circuit protection device. Starting current is not something that the motor manufacturers always publish in the datasheet, and especially not an exact value since it depends on the whole system, so it is almost like a guess as to whether or not the generator will be able to get the system started. But there is good news, the watermaker pump is not loaded, meaning the pressure is not turned up to the operating pressure, when the motor is started. However, the safest, most conservative way to make sure the system will start is to buy the most efficient AC motor that you can find.
I reached out to the folks at CruiseROWaterandPower.com when these questions were bouncing around my head and though they didn’t directly tell me what motor they were using in their system that claims to work with a Honda EU2000i, they were very helpful and sent me a simplified version of the owner’s manual for one of their systems. The motor they are using is a premium efficiency motor. They must have had a special motor packaged for their system because I could not find a model to mate up with the high pressure pump, which needs a 56C frame, but I was able to find one with a 56 frame and the manufacturer had motor C-face conversion kits available. Ultimately, I bought a premium efficiency 1 hp AC motor at a really good price and a separate face kit. Installing the face kit involved cutting some of the motor bolts to a fairly precise length, which was a little stressful, but once that was done it was a perfect fit. Below is a picture of the pump mounted to the motor and 2 of the 3 the pre-filter housings when I was doing a test fit.

Watermaker motor, pump, and filter test fit
The membrane housings generally used are fiberglass, since it is non-corrosive, and are to be able to handle pressures up to 1,000 psi. The high pressure rating is why the cost of these housings is so high. Upon receiving the housing, I realized that it is not a standard fiberglass like used for making boat hulls or even some pressure tanks used in other plumbing systems, it is a much harder, more rigid material almost like a ceramic. There are several manufacturers of these housings and they are all made to accept the Dow Filmtec membrane elements, which are pretty much the standard for desalinization with RO. I found an online retailer called wateranywhere.com, somehow affiliated with Applied Membranes, Inc., that has good prices and helpful customer service. I purchased my membrane and housing, all of my pre-filters and their housings, as well as my mounting brackets and water tester from them.
The other specialty items were the high pressure fittings. The fittings must be rated for the maximum 1,000 psi operating pressure as well as not corrode with saltwater under such high pressure. When I say fittings, I mean the elbows, tees, adapters, hoses, valves, and gauge that are connected between the pump, membrane, and brine discharge. Again the material of choice is stainless steel. The most specialized parts were the regulating valve, the pressure gauge, pressure relief valve, and the stainless steel flexible hose. I used all Parker fittings and found that they were pretty easy to get by looking up a distributor on the Parker website. The distributor I used was Colliflower in Capitol Heights, MD who specialize in hydraulic hoses and fittings. They had to special order everything since stainless steel is not normally a stock item, but it didn’t take very long to get. Tony was very helpful and took the time to help me figure out what would be the most cost effective way to connect up my system since there were so many different fitting and connection options.
Aside from those items, the rest of the system consists of more standard, off-the-shelf components. I had purchased all of the parts and pieces before we left Maryland and hoped I remembered everything for an easy install along the way and things worked out pretty much as I had imagined. One of the more difficult parts of the installation was mounting the pump and motor to the boat. I only had space under the starboard salon settee and needed to make a base that would allow the pump to sit level and hold well enough that I did not have to worry about this 40+ pound object coming loose in rough seas or when heeling. As is usually the case for mounting something on the hull, this meant some fiberglass work. I had cut some pieces of wood to the angle of the hull, drilled them for mounting bolts, and then fiberglassed them in place in Charleston, SC while waiting for the weather to clear up to continue south. The motor mount turned out to be pretty permanent, but at least the pump and motor can be easily removed and the through-bolts make removal easier than if I had just used screws.
After mounting the motor and pump in place and installing the pre-filter housings and the boost pump, it simply became a matter of connecting up hoses and valves. Even the high pressure side was pretty simple, just standard NPT threaded fittings just screwed together using wrenches. For the low pressure side, I made it really easy on myself and bought plastic quick-connect fittings which made their installation a breeze. I found a website that had all of the low pressure valves and fittings I needed at much lower prices than I could find anywhere else, USplastic.com. I did have to buy a minimum quantity of polyethylene tubing which ended up being almost enough to do 2 water maker installs, but the prices were so low that no other place I could find even came close even with the minimum quantities. Below are some pics of what the system looks like as installed, one looking forward and one looking aft.
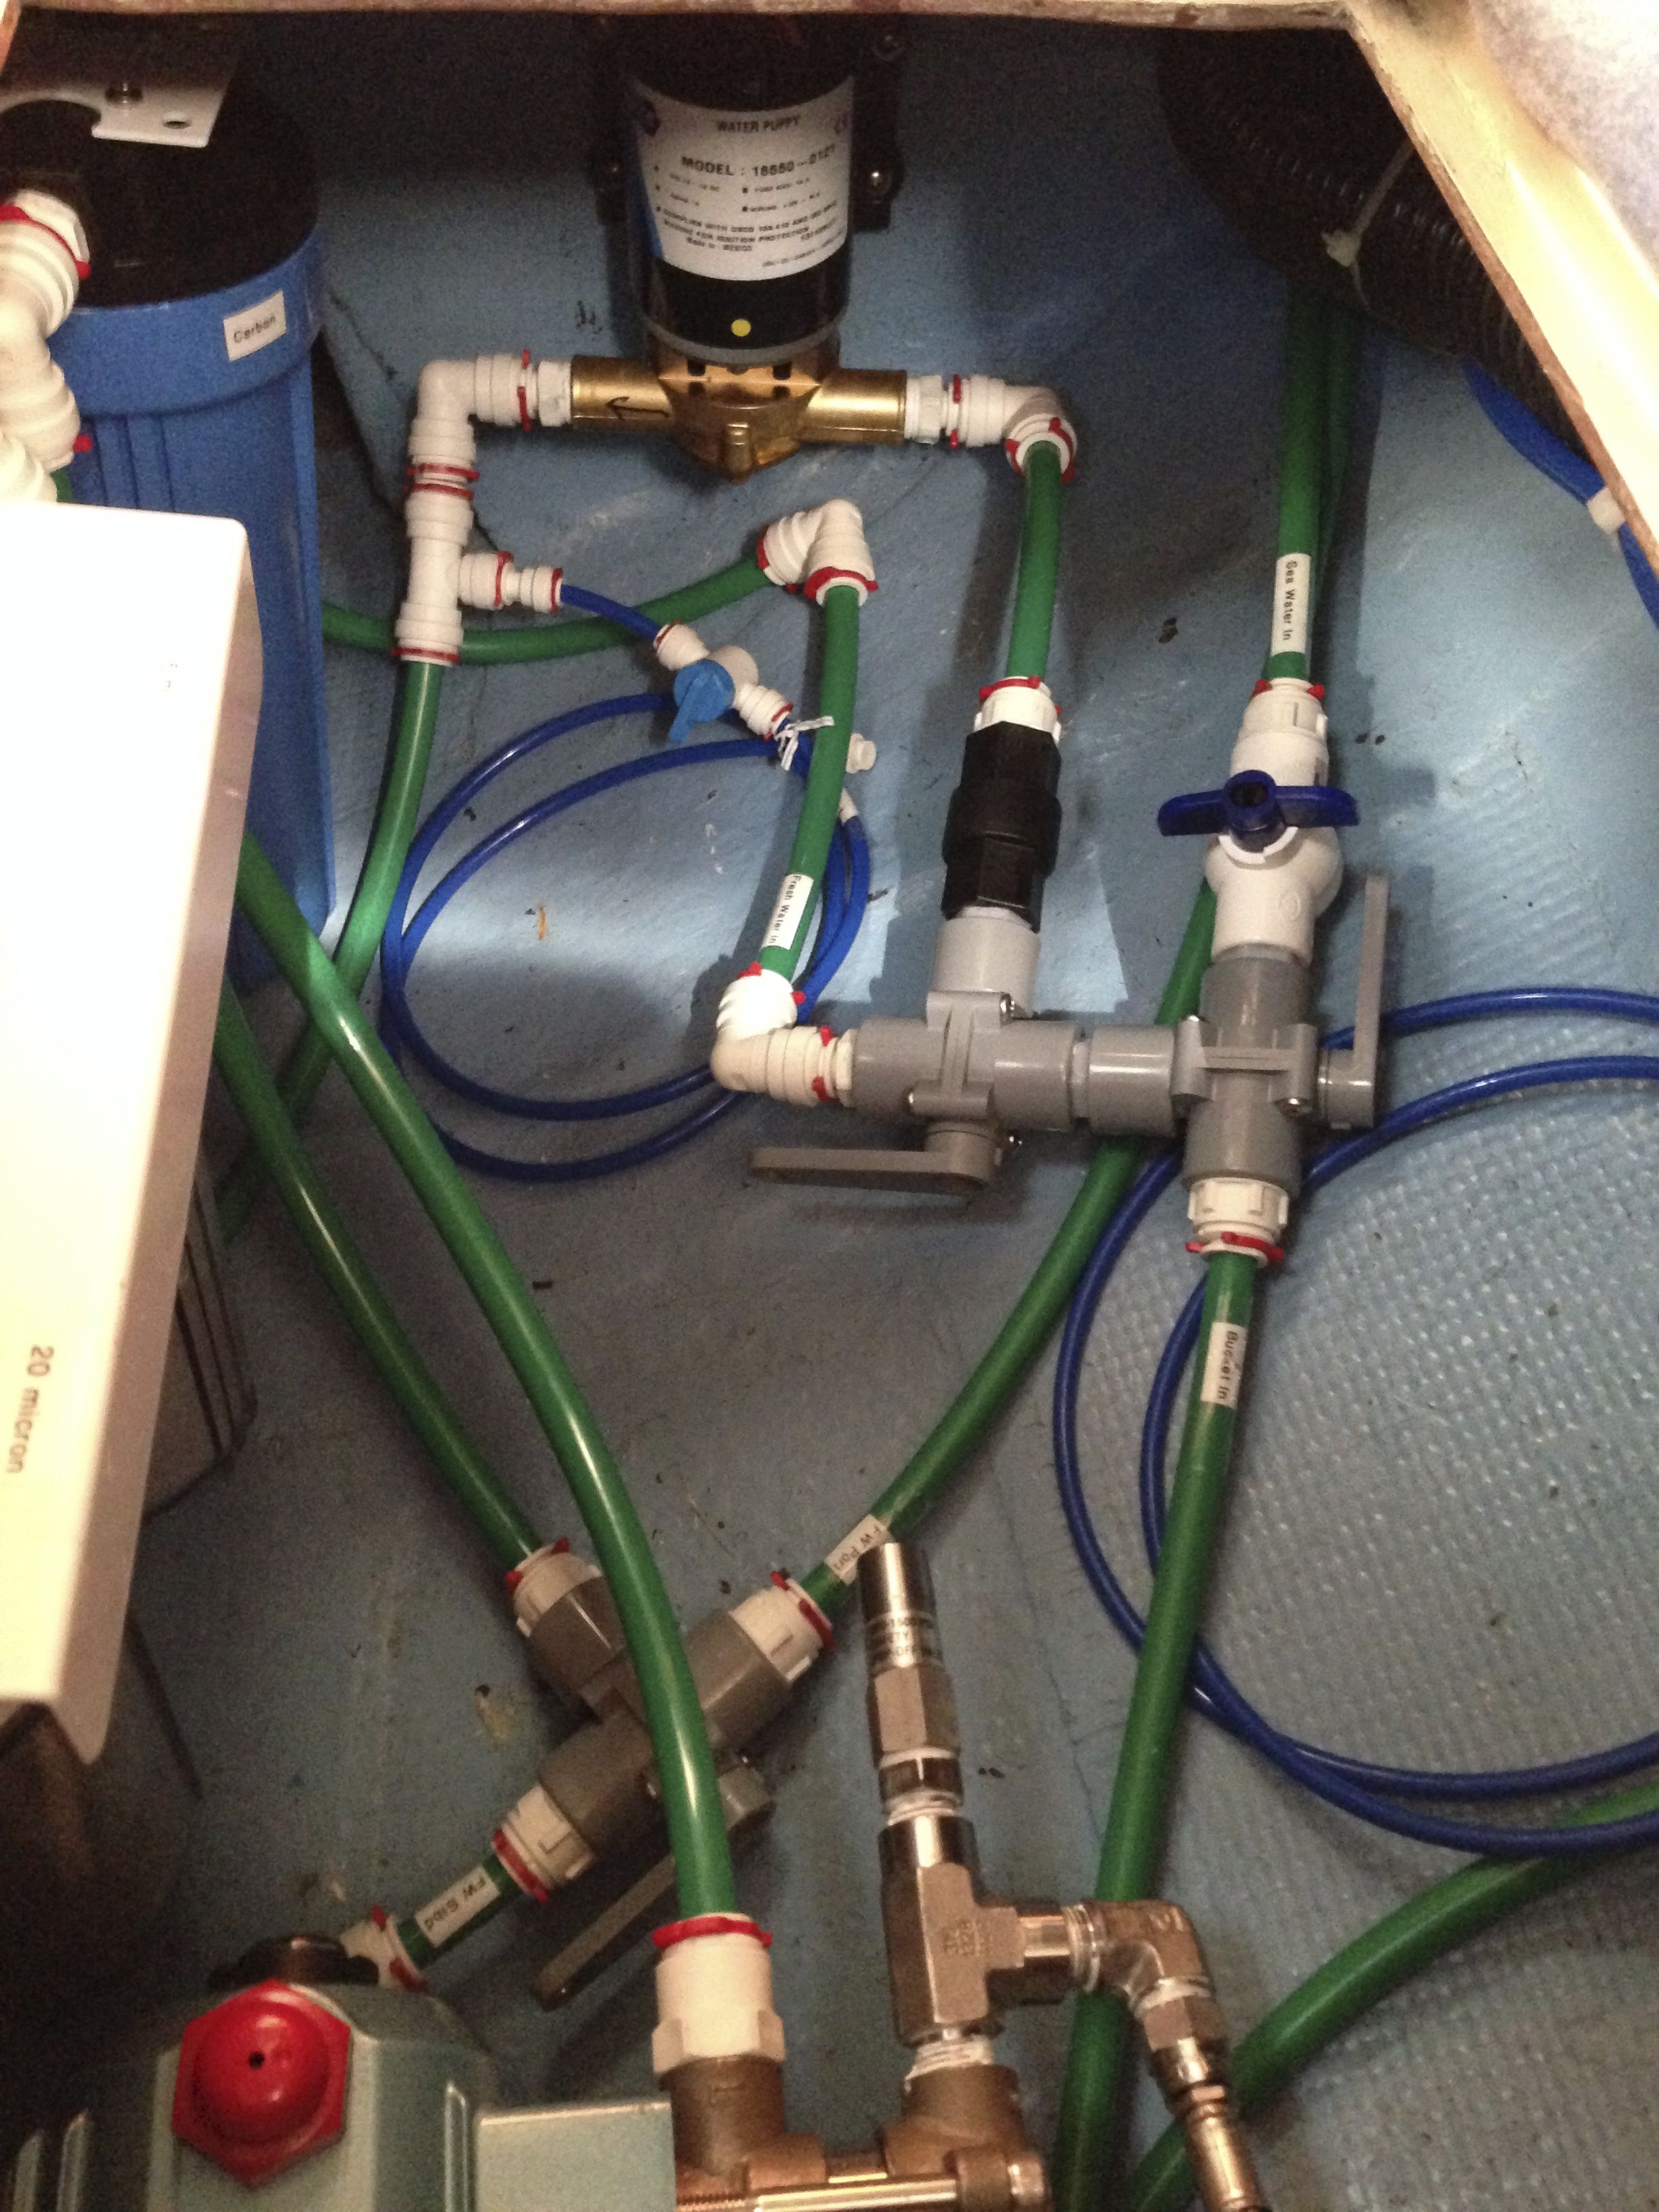
Watermaker – looking forward
For the image looking forward: On the left, are the pre-filters, a 20 micron and 5 micron, and the blue housing holds an activated carbon filter. The activated carbon filter is used during the freshwater flush after running the system to remove any residual chlorine that may be in the water from prior fill-ups with municipal water. Chlorine can damage the RO membrane element. At the top of the image is the boost pump which is connected to the ship’s DC electrical system. Below that are the main valves used to change between bringing seawater into the system, freshwater from the ship’s tanks, or a piece of tubing that can be put in a bucket for winterizing or “pickling” the system. At the bottom of the image is the high pressure pump head and under that is a selector valve so we can switch between our two tanks for the freshwater flush.
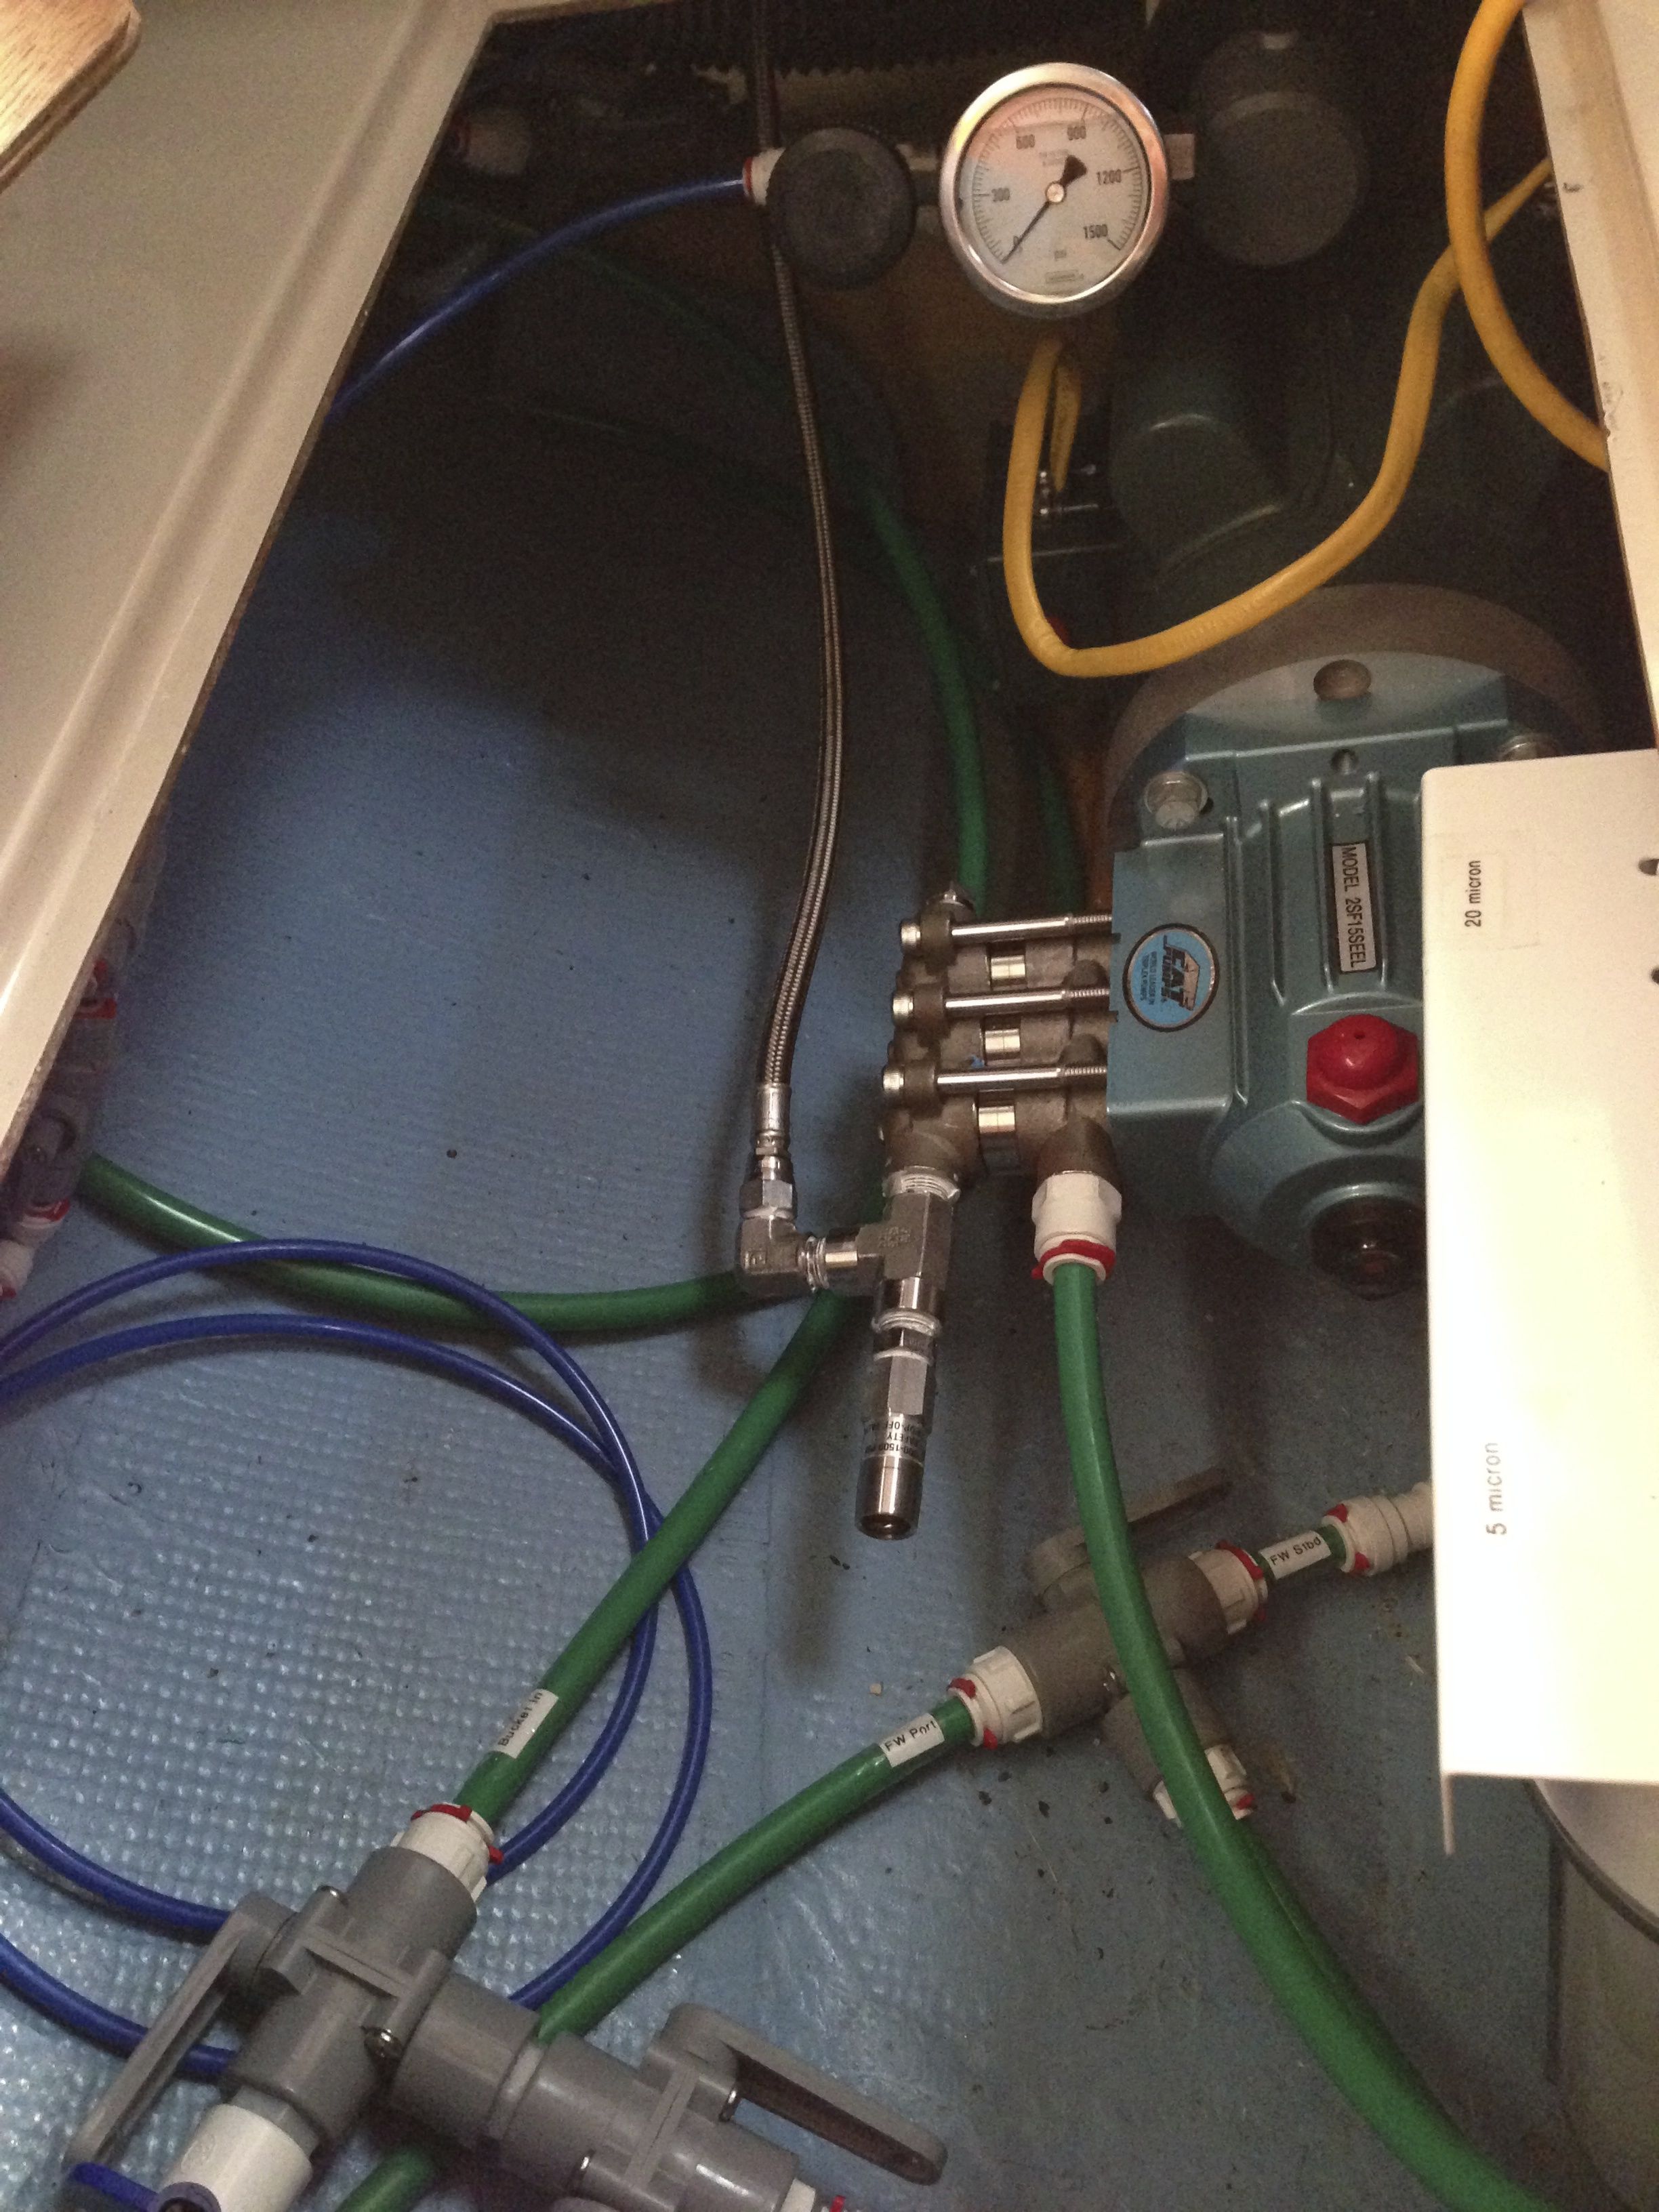
Watermaker – Looking aft
For the image looking aft: On the right is the pre-filter housing (again) and behind that is the high pressure pump and motor. The green tubing is the inlet tubing and the stainless steel tubing goes to the membrane housing which is installed lengthwise behind everything above one of our freshwater tanks. In the top center is the system pressure gauge and to the left of that is the pressure regulating valve.
I feel like the systems appear more complex than they really are, but they definitely require upkeep. The system has to be run every 5-7 days to to prevent little microorganisms from growing on the membrane which degrade performance. The output I have seen from our system is as expected. It produces about 20 gallons an hour of freshwater, which translates to having each of our small freshwater tanks filled in just over an hour of run time. Our system’s output is limited by the membrane’s ability to produce freshwater. If I had purchased 2 membrane housings and membranes, then we would have been able to produce about 30 gallons an hour and the output would have been limited by the capacity of the high pressure pump. However, I think we are doing just fine with the one membrane and it isn’t necessary for us to have the additional membrane given the extra expense. Now that we have been in the Bahamas for a while and the watermaker has been our sole source of water, my routine has been to run the system every 3 days or so to refill the tank that has been drained and then switch over to the other tank which is already full. Keeping one tank full at all times gives us piece of mind in the event that something happens to the watermaker. Now that we are over the initial sticker shock of the system, we love having the ability to have fresh water on-demand and don’t know if we could ever do this trip without one!
