Anybody who knows JR or has been reading this blog for a while, knows how particular he is about things. Sometimes I want to strangle him because he takes forever to make a decision but in most cases, I’m thankful for his “precision.” When we decided to go with the semi-flexible solar panels, JR wanted the mounting to look “finished.” We knew that sewing industrial Velcro on the bimini and dodger and sticking it to the underside of the panel would do the trick, but he wanted it to look a little more custom. He did a bunch of internet research and found these two sites that had examples of “lapels” that held the panels in place and provided “cable management” as our dear friend Mitchell called it :) Also note, we did not use Solbian panels, we used cheaper ones from Discount Solar :)
One of JR’s favorite sites, this dude is as “precise” as it gets: http://www.pbase.com/mainecruising/solbian_solar_panel
This site has a few good pics, and a great little drawing at the end to help with measurements: http://www.bruceschwab.com/uploads/solbian-to-canvas-guidelines.pdf
As with most great ideas, ours was stolen! Inspired by the sites we had found, we sketched up something that we thought would work for us and I made a little template to get sizes and seam allowances and stuff just right. Notice the staples! I went with a 4” width (½” seam allowance on the front, 1 ¼” fold over for cables and ½” strip of Velcro on top, and that left 2 ¼” for the underside which included 1” of Velcro and stitching). I figured I’d cut a bunch of strips as long as possible and customize the length as needed per panel.
Thankfully, the previous owners of Journey gave us some extra Sunbrella that matched our canvas and it was just enough to get the job done. I wanted a hot knife to make canvas cutting a little cleaner but I don’t have one! Another benefit of being in Vero Beach is the corkboard in the lounge. People post parties, and excursions, sign-up sheets, and notices, so I posted a note asking to borrow a hot knife. Within a day the lovely folks from Kintala came through for me :)
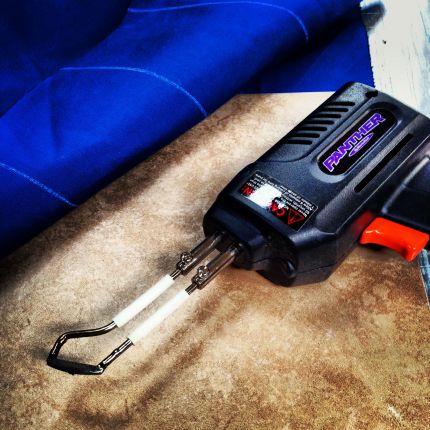
The awesome hot knife (I kinda’ need one) and the canvas all marked up. I used the tile as my straight edge because my only big ruler is plastic! Why do we have a tile on board? That’s another post!
Hot knife in hand, measurements made, I got to work cutting rectangles! Once finished, I took them to the lounge and ironed in all of my seams. I was quite a spectacle ironing in the lounge! Doesn’t everyone go to the marina lounge to iron!? Geez!
While is was cutting and ironing, JR had time to think about placement and was soon able to give me measurements for length. Before I started sewing, I cut the strips to length, keeping in mind a ½” seam allowance on either side. Then I sewed it all up!
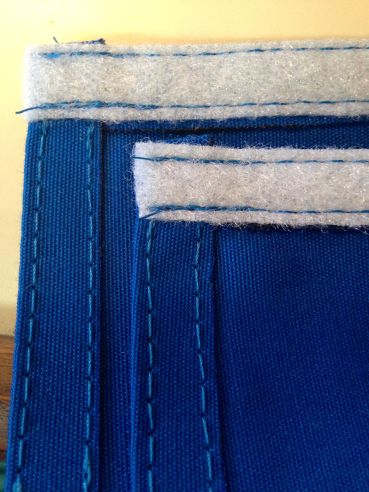
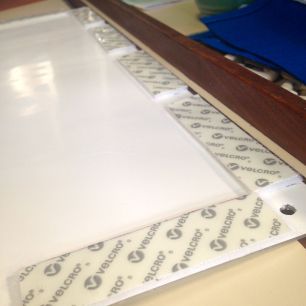
Once all of that mess was done, it was time to stick Velcro. Sticking Velcro at Velcro Beach was so silly! We took a 2” strip of industrial Velcro and cut it into ½” strips for the top of the panel (see above) and 1” strips for the bottom. We did all of the Velcro sticking at once and put all of the lapels on the panels because we figured they’d be easier to work with and place on the bimini and dodger. (Click for full pic!)
JR had already outlined in tailor’s chalk (gracias Tia!) where the panels should sit on the bimini and dodger and which direction (for cable management, of course!). First he did it with no lapels (actual size of the panels) then he did it with the lapels on (about a ¾” larger all around) that way we had a good idea of where the panels lived once we took the bimini and dodger off!
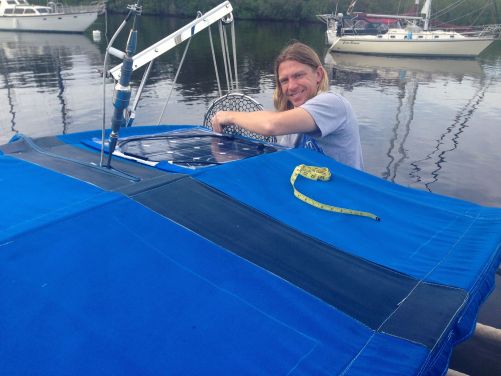
JR outlining the panels with the lapels on. You can see the lines of just the panels alone in the foreground of the pic.
We started with the bimini, so we took it off and brought it in. Remember, our boat is compact, so it was interesting working with that giant piece of canvas inside the boat, but we worked it out. We did one panel at a time (there are 4 on the bimini, 2 on the dodger), first putting basting tape inside the chalk outline to help the lapels stick (the basting tape was VERY helpful, by the way) then we unstuck the bottom Velcro and laid the whole thing in place. We pushed down the perimeter and made sure all of our sticky stuff was sticking and then took the panel off. With the panel gone, we were able to run the bimini and lapels through the sewing machine. I used a regular stitch, about 5.5 for the stitch width, a little extra tension for the sake of the canvas and put a stitch on either side of the Velcro. It wasn’t terrible. We repeated these steps with the other 5 panels. The bimini was a cinch, the dodger was a beast, mainly because of the inflexible strataglass.
I have to give props to my little sewing machine. A year ago, I didn’t know what a bobbin was, literally. I also didn’t know how much of a workhorse this machine is. It belonged to JR’s mom who passed away 2 years ago. When we were tasked with the heartbreaking job of clearing out her house, we decided to take it hoping it would come in handy and hoping we could find some of the joy it brought to her. Boy has it. I think she would be really pleased knowing that her machine has contributed to our boat’s beauty and functionality. She may not be too happy when I slip 4 layers of canvas through it, but I know she’s glad we’re using it. Anyway, it really came through for us this time around.
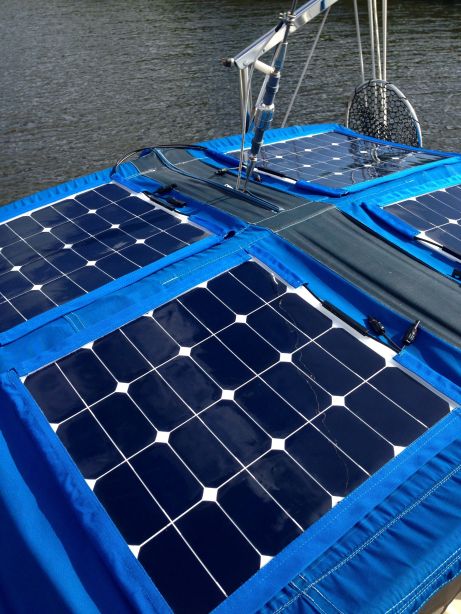
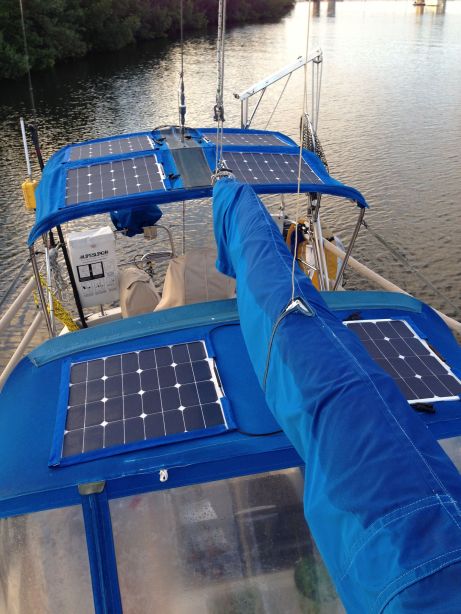
And that’s about it! Here are some pics of the finished install. JR doesn’t have it up and running yet, we need another Home Depot run, so all of the wires and stuff aren’t there, but this is pretty much what it looks like. We are both really pleased with the outcome, and although it was a bigger project than we had anticipated (aren’t they all!) it was well worth it.
It wasn’t all smooth sailing! Here are a couple of things we learned:
- Basting tape is the bomb. If I didn’t have the luxury of ironing, I would have used basting tape for all of the hems.
- Canvas is thick, factor that into your measurements. Newbie mistake I’m sure, but if you’re giving yourself a ½” seam allowance and you’re using a thick fabric like canvas, give yourself a little extra. Those folds take up some of your material!
- Use tailor’s chalk. By the end, we were chalk marking all sorts of stuff. When we were taking off the panel, we would lose a Velcro or two, so we started chalking where the Velcro lived before it got peeled off. Chalk it up, man. It’ll come off eventually and save you a little sanity.
- Make it custom. If you’re going through all this trouble, make it really custom to your boat. JR thought through all of his wiring and connectors before I did any cutting. That way we knew where we needed gaps in the lapels.
- Streamline. Try to streamline the process and make things consistent. Then you’re not wasting time doing things one at a time. Once everything was thought through, JR gave me a list that said 8 (lapels) – 20 7/8” and 4 (lapels) – 22 9/16” (yes, he used 16ths of an inch!), etc. Having consistency meant faster production! We also used certain measurements when placing the Velcro on the bottom of the panels. That way, if one peeled off, we knew about where it lived…
- Clear out your space if you’re working on a boat! A messy, squishy boat gets frustrating fast! Tidy up your workspace and try to make it as orderly as possible to cut down on your frustration.




Great tips, I’ll be referring back here when it comes time for us to do the same! Is there a specific reason you guys choose to do 4 smaller panels instead of 2 larger ones on the bimini? Just wondering if the shape of the bimini (not completely straight/level) had anything to do with it. Very helpful info :) Happy sailing!
Absolutely yes! Not sure if you can see it, but the bimini has a pole going through the middle. The panels are not bendy enough to put over the pole. That’s why we went with little guys instead of bigger ones!
I am continually impressed with the ingenuity the two of you devise in your projects. Now, this is supposed to keep the batteries charged, correct?
Just went to the BRAND NEW Harbor-Freight that opened a week ago here in LaVale. Walked in to buy a $7 tarp…. walked out after spending almost $50. And boy did I have to show restraint!
I like the install. Looks very nice and professional.
I live by Compass Marine too. Rod, the owner, is a great guy. Always willing to help and extremely knowledgable. I have talked to him a couple of times about the solbian panels and other stuff. We really want those but they are a lot of money. It will be interesting to see how these more affordable ones work for you.
By the way, Rod from Compass Marine posts on sailboatowners.com under the name Maine Sail.
Fair winds,
Jesse
Thanks Jesse. We will keep you updated and are excited to see how they do as well! If you see Rod again, please tell him he has a BIG fan on Journey!
Thank for the post. Look very professional and it is a good idea.
Happy sailing!!!
The solar panels and flaps look GREAT. Way to go!!! We miss you! Get your ass to Ft. Lauderdale!
Great post! Sorry if I’d known you needed a straight edge I would have lent you one of those too! Sailrite has an awesome chalk pencil that’s refillable :)
Deb
S/V Kintala
http://www.theretirementproject.blogspot.com
JR and Drena,
Just stumbled into your blog while doing some research for my own flexible solar install. Awesome blog and great info on the panel install. I somewhat understand your transition back to the 9-5. Although much shorter, we took a trip earlier this year down to the Keys for 6 weeks. We are on the return in blog time – http://www.havewindwilltravel.com. I can’t even imagine how it must feel after escaping for a year.
One of the many things we learned on our short trip is that we need some solar panels for the next trip. I am in the 9-5 planning my escape for the next trip. Anyhow, I had a question I was hoping you could answer in regard to the install of your panels. The creation and installation of the lapels to the bimini I understand. I am wondering how you installed the Velcro to the panels and how it held up. Did you sew the Velcro to the panel? I’m contemplating my own plan of attack and would love any insight you can provide.
I am looking forward to going back and reading about your entire adventure.
Cheers,
Phillip
Hi Phillip,
Thanks for your kind words. We have been meaning to do a follow-up on a couple of things and the solar panel install is one of them. We did not sew the Velcro on, only adhered as it came out-of-the-box. We had it on both sides of the panel and found that method worked well. There are some areas where the lapels were holding the wires in place and the Velcro is starting to pull away from the top of the panel because of the additional strain. We aren’t worried though since the Velcro under the panel is holding on really well and the top lapel part part is strictly cosmetic. We have discussed sewing the Velcro on the tops of the panels as a solution next spring. Our panels are pretty thick though so we are thinking that will require drilling small holes and then hand-stitching it on. Good luck!
Thanks so much for the info on the installation. We are thrilled to be installing these panels to help offset our power consumption which is mostly just the fridge. We will have some details and pictures of the install over on the blog once we get the blog back in “real time” in case you are interested to see how it comes out. Just don’t expect the job or write up to look as good as yours.
Phillip
The install looks great! Thank you very much for taking the time to share your experience. I am starting this project now.
Cheers!
Stacey on s/v Smitty
Good luck! If we can help in any way, you know where to find us!
i’d love to know the size of the panels…because i keep thinking that 1 or 2 135 watts are too big to mount on my dodger…i’d rather get 2-3 small ones that i can easily spread out..like you did..thanks.
Next time you bump into Kintala, say hey from Boulder Yacht Club :)