i started on our binnacle cover, oh… like in june, when i was coming down from that black-out curtain high. then i attempted a binnacle cover, for THIS crazy binnacle:
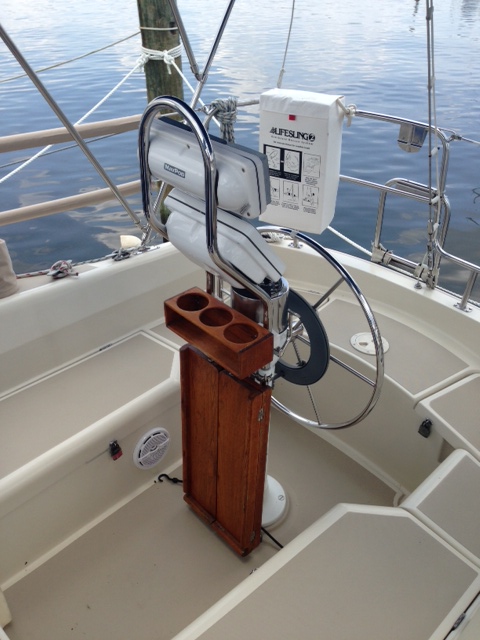
our crazy, complicated binnacle!
boo on it.
since i’m new at sewing, i decided to go with sailrite’s binnacle/wheel cover kit, which is not a small investment! it came with lots of useful stuff like patterning material, basting tape, a zipper, shock chord, and more. i would like to go on record and say that making a complicated binnacle cover is not a project for beginners. i had no business attempting this and although sailrite’s kit included a step-by-step dvd (which was really helpful, but equally not helpful) it was step-by-step for a teeny-tiny, non-cup holding, non- navpod thingie, non-foldey table, non-crazy angled, 3 foot tall binnacle. not a crazy one like ours!
the first thing i had to do was make a pattern for the binnacle. what? i’ve never even used a pattern and now i’m gonna make one. like i said, the video was helpful, but i had to wing some things… lots of things… if you’re gonna do it, make sure you watch the video all the way through (a couple of times) ’cause in my video, the guy totally screws up and the seamstress (who is amazing, btw) has to do all this stuff to fix it. and he gave a few good tips later in the video like, “oh, i really should have marked the center mark here so that i could line up each piece of the pattern.” yeah, that was kind of a big deal. but i worked it out.


then i had to transfer the pattern onto the sunbrella and cut it all up! they don’t send you enough fabric to make mistakes!

transferring pattern to canvas!
this was all still in june. i didn’t lose interest until i started putting it all together. sigh. the main thing i did wrong was to NOT sew it on the boat. i kept taking it to the boat and then making adjustments and pinning and stapling (still the best tip ever!) and then bringing it home to sew, and then going back to the boat and trying it on and then hating it. lots of seam ripping and lots of frustration. i should have just taken the machine to the boat and done it all there from the get-go. sew the cover near the binnacle. duh. newbie mistake, right?


once i took the machine to the binnacle, i was solid.
other than pattern making, the zipper was a little tricky for me, but once i bought a zipper foot, it was a breeze! also, the shock chord was a huge pain! what sailrite doesn’t tell you, is that if you don’t have a fancy-schmancy sailrite machine, you’re gonna struggle. four layers of canvas is tough. four layers and a zipper is tougher. running your needle through four layers of canvas and the 3/16″ shock chord in order to gather up the bottom was impossible. i even tried my auntie’s crazy industrial machine and broke my needle. i had to hand sew it and i know nothing about hand sewing, so it ended up looking like this:

shock chord + struggling machines + hand sewing = ugly, ugly yuck!
but in the end it turned out ok. jr says he really likes it and that i’m being a grumble puss. i’m grumbly because i can see all the messy details and it doesn’t look perfect, but whatev. here are a few pics of the finished cover. oh, and we decided to put the zipper on the non-wheel side so that we can use the table without removing the cover completely. totally custom, baby!
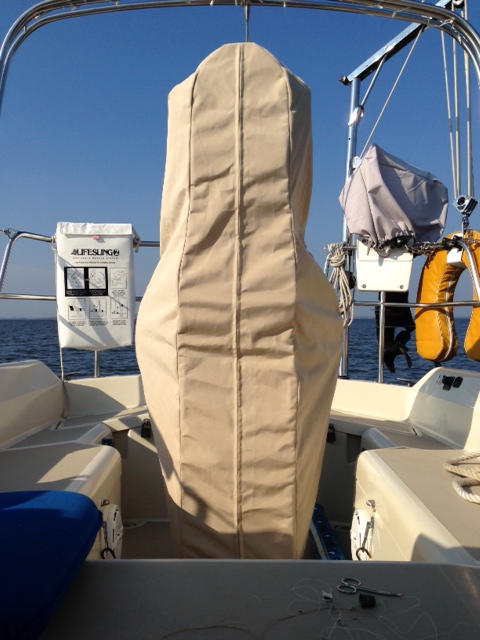
stick a fork in it.

that’s a lot of canvas!

made with love, by me :)

Looks good! Should have had you hem a pair of pants for me while you were here! :)
I think in the end that it looks good. Don’t worry about the zipper shock cord stuff not looking the best. Isn’t that at the bottom? And who’s going to see that? Good for you for doing this project. I also like to sew having my machine on location for all the fitting and minor adjustments that seem to go hand in hand with these projects.
Lorraine
S/V Changes
Changesgoingsouth,com
Good job! I just started tackling re-covering the berth cushions – and eventually the salon stuff, and probably everything else I can cover will be on the list. Not a hard core seamstress – so mine are imperfect as well. I just try not to look at the “mistakes”. It’s really just character, right?
Great idea on the table side zipper!
(I see a Sailrite machine in my future, as I was breaking needles left and right!)
Awesome job. I loved it, then I came to the picture with the heart button- and loved it even more. I am going to have to come up with a sweet little “tag” of my own for my projects. Thanks for sharing!
thanks! although the color faded on the little heart cause of the sun within, like, 2 days. oh well, it’s still pinkish :) thanks for reading!